Uit Bitbybit Information Systems
Geen bewerkingssamenvatting |
|||
| Regel 15: | Regel 15: | ||
#Click a location to see its corresponding rooms appear on the right. | #Click a location to see its corresponding rooms appear on the right. | ||
#: <p></p> | #: <p></p> | ||
#:[[Bestand:100enWebViewExpandRoomSelection2.png| | #:[[Bestand:100enWebViewExpandRoomSelection2.png|1100px|none]] | ||
#: <p></p> | #: <p></p> | ||
#:In the figure the location 'A Wing' was selected and its corresponding rooms LBR and MNZ appear on the right. | #:In the figure the location 'A Wing' was selected and its corresponding rooms LBR and MNZ appear on the right. | ||
| Regel 22: | Regel 22: | ||
#:In the figure the locations 'C Wing' and 'A Wing' have been selected. | #:In the figure the locations 'C Wing' and 'A Wing' have been selected. | ||
#:<p></p> | #:<p></p> | ||
#:[[Bestand:100enWebViewExpandRoomSelection3.png| | #:[[Bestand:100enWebViewExpandRoomSelection3.png|1200px|none]] | ||
#:<p></p> | #:<p></p> | ||
#Tick the boxes of the rooms you wish to add to the selection. | #Tick the boxes of the rooms you wish to add to the selection. | ||
| Regel 32: | Regel 32: | ||
#Click the 'Save to basket' button. | #Click the 'Save to basket' button. | ||
#:<p></p> | #:<p></p> | ||
#:[[Bestand: | #:[[Bestand:100enWebViewExpandRoomSelection6.png|250px|none]] | ||
#:<p></p> | #:<p></p> | ||
#:The system springs to the 'My selection' tab, 'Room' subtab and the selected rooms have been added. | #:The system springs to the 'My selection' tab, 'Room' subtab and the selected rooms have been added. | ||
#:<p></p> | #:<p></p> | ||
#:[[Bestand: | #:[[Bestand:100enWebViewExpandRoomSelection5.png|550px|none]] | ||
#:<p></p> | #:<p></p> | ||
#:See also: [[{{NAMESPACE}}: | #:See also: [[{{NAMESPACE}}:WebView room selection|Room selection]]. | ||
===Search=== | ===Search=== | ||
Versie van 6 apr 2022 19:25
Expand Room selection
Steps
- Click the 'Expand selection' tab.
- Click the 'Room' subtab.

- A list of locations appears.
- An example of a location is 'A Wing'.
- Click a location to see its corresponding rooms appear on the right.

- In the figure the location 'A Wing' was selected and its corresponding rooms LBR and MNZ appear on the right.
- You can also select several locations at once.
- In the figure the locations 'C Wing' and 'A Wing' have been selected.

- Tick the boxes of the rooms you wish to add to the selection.
- In de figure the rooms LBR and MNZ are ticked.

 Tip: Tick the box at the top left (next to Room) in order to tick all the rooms of the location.
- Click the 'Save to basket' button.

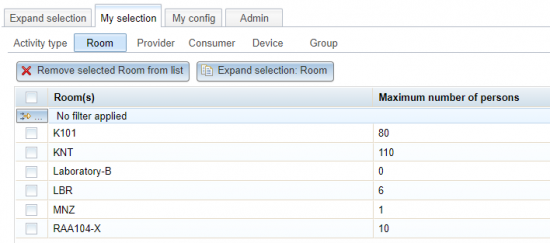
- The system springs to the 'My selection' tab, 'Room' subtab and the selected rooms have been added.
- See also: Room selection.


Search
- If the list of rooms is very long use the Search button to find rooms.
- Enter the text of you are looking for in the Search field.
- Click the Search button
- The rooms appear on the right (if found).

- In the figure the search string is 'vision' and rooms containing this string appear in the table titled 'search results: vision', on the right.

- Tip: If you click the Search button with an empty search field then you will get all rooms (of all locations)
Create a Room
- Should you miss a room you can click the 'Create Room' button.

- See also: Create a Room type. This button is only visible if you have administrator authorisation.

