(→Working times) |
(→Working times) |
||
| Regel 157: | Regel 157: | ||
:<p></p> | :<p></p> | ||
The figure below shows that if you switch to standard times this is equivalent to from 09:00 to 12:45 | The figure below shows that if you switch to standard times this is equivalent to from 09:00 to 12:45 | ||
| − | + | :<p></p> | |
| − | + | :[[Bestand:100enWebPlanboardBookDateAndTime15.png|450px|none]] | |
| − | + | :<p></p> | |
It is also possible to view the duration in minutes.<br> | It is also possible to view the duration in minutes.<br> | ||
In the figure below the duration of 2 working hours is represented as 225 minutes. | In the figure below the duration of 2 working hours is represented as 225 minutes. | ||
| − | + | :<p></p> | |
| − | + | :[[Bestand:100enWebPlanboardBookDateAndTime14.png|550px|none]] | |
| − | + | :<p></p> | |
{{lightbulb}} | {{lightbulb}} | ||
*It is not always possible to convert standard times to working times with a duration in hours. | *It is not always possible to convert standard times to working times with a duration in hours. | ||
Versie van 15 mei 2023 om 15:56
Day and time selection
The Periode frame (see figure below) contains fields for you to enter and afterwards view information about dates and times.
You can enter when a booking takes place and see this information after the booking has been scheduled.
You can determine the date ín 3 calendars: via 'Specific date', via 'Standard weeks' and via 'Working weeks.
![]() Tip: You can always switch between the 'Standard weeks' and 'Working weeks'.
Tip: You can always switch between the 'Standard weeks' and 'Working weeks'.
- If only 1 day is selected then you can also switch to and from 'Standard date'.

Date selection
The option 'Specific date' is the standard selection. Use this option to enter single date.
- Click the date button on the right. A calendar appears.
- Click the left arrow above to select a preceeding month.
- Click the right arrow above to select a succeeding month.
- Click a year below to select it.
- Click a day in the middle to select it.
In the figure the selected date is 12 May 2013.

![]() Tip: You can also type a date directly in the date field. You must use the correct notation such as shown in the figure above: '12/05/2023' (dd/mm/yyyy).
Tip: You can also type a date directly in the date field. You must use the correct notation such as shown in the figure above: '12/05/2023' (dd/mm/yyyy).
Time selection
The option 'Standard hours' is the standard selection.
- Enter the begin time.
- Type the time in the 'From' field.
- Enter the end time.
- Type the time in the 'Until' field.
For example: from 10:00 to 12:00.

Standard duration of a booking
The system administrator may configure a standard booking duration.
When you open a new booking form in the timetable then the end time will get set automatically.
In the figure you selected a new booking to start at 12:00 and since the duration is 120 minutes the end time is automatically set to 14:00.

If you have administrator authorisation then you can find an explanation for this setting in Booking form settings .
Standard week selection
Booking with several weeks
You choose the Standard weeks calendar when you need to schedule a series booking that takes place on several days and weeks.
- Select Calender.
- Enter the year.
- Click the menu icon on the left side of the Year field to select the year.


You can also type the year directly in the Year field using the notation: '2023' for example.
- Enter the weeks.
- Click the menu icon on the left side of Weeks to get a list of selectable weeks.
- You see the calender weeks of the year you entered with their begin and end dates.
- Check the box of a week to add it to the field.
You can also add several weeks.- Click the cross on the bottom right to close the window.
- Click the menu icon on the left side of Weeks to get a list of selectable weeks.
- Enter the number of weeks.
- If the number of weeks equals the number of entered weeks then the WebberAlgemene benaming voor WebPlanboard of WebView. shall book all selected weeks.
In the figure the selected weeks are 19 and 20 and 'Number of weeks' is 2.

Booking with a choice from several weeks
You can let the WebPlanner search for suitable weeks.
- Enter the possible weeks in which the booking series may occur.
- Enter the number of weeks the booking series occurs in.
- If the 'Number of weeks' field is less than the number of entered weeks it means that you let the WebPlanner choose in which weeks to plan the booking.
In the figure the WebberAlgemene benaming voor WebPlanboard of WebView. may choose 2 weeks from the calendar weeks 21, 22 and 23.

Booking with several days
- Check 1 or more days.
- Enter the number of days per week in the 'Days p/w' field.
- If the 'Number of days' equals the number of entered days the WebberAlgemene benaming voor WebPlanboard of WebView. shall book all the days.
- In the figure the WebberAlgemene benaming voor WebPlanboard of WebView. shall schedule the booking on Thursday and Friday.

Booking with a choice from several days
You can let the WebPlanner choose the most suitable days.
- Check the possible days in which the booking series may occur.
- Enter the number of days per week in the 'Days p/w' field .
- If you enter less days in 'Days p/w' than the number of days selected in 'Days' then you enable the WebPlanner to choose the most suitable days for the booking occurances.
In the figure the WebPlanner may choose 2 days out of Wednesday, Thursday and Friday.

![]() Warning: If the option 'Days p/w' isn't visible (since this field is configurabel) then the WebPlanner books all the days you selected.
Warning: If the option 'Days p/w' isn't visible (since this field is configurabel) then the WebPlanner books all the days you selected.
This applies to normal and non-available booking types.
Working week selection
The option 'Working weeks' is visible when the WebPlanner is configured with 'Work' dates: Working years, Periods and Working weeks.
A working year can begin and end on a different date than the begin and end of the calendar year.
A working year contains 1 or more periods and a period contains 1 or more working weeks.
For example: working year of the WebPlanner used for this documentation is divided into 4 periods: spring, summer, autumn and winter.
Book several working weeks
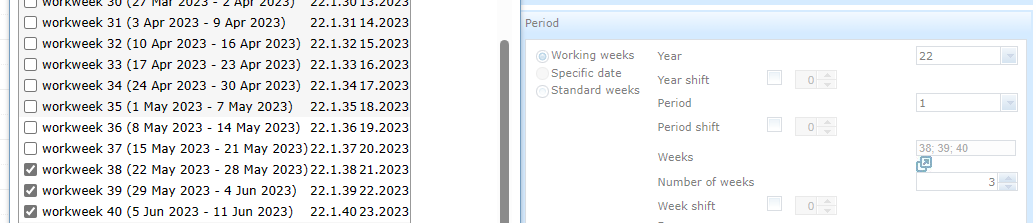
- Enter the working year.
- Enter the periode, 1 for example.
- Enter the working weeks.
- Click the icon to get a list of working weeks.
- Once you have select a week ik gets added to the Weeks field.
- Click the X at the top right to close this window.
- It is first necessary to enter the year and the period and then the weeks.
- Click the icon to get a list of working weeks.
- Enter the number of weeks in the 'Number of weeks' field.
- If the number of weeks equals the number of selected weeks in the 'Weeks' field the WebPlanner shall book all the weeks.
- In de figure the selected working weeks are: 38, 39 and 40 which correspond to the standard weeks starting 22-05-2023, 29-06-2023 and 05-06-2023.


Book with a choice from several working weeks
- Enter the work weeks.
- Click the icon to get a list of the working weeks of the period.
- Once you have selected a week it gets added to the 'Weeks' field.
- Click the icon to get a list of the working weeks of the period.
- Enter the number of weeks of the booking series in 'Number of weeks' field.
- If you enter less weeks in 'Number of weeks' than the weeks in the 'Weeks' field the WebPlanner may choose the most suitable weeks for the bookings.
- In the figure the WebPlanner may choose 2 weeks from the working weeks 38, 39 and 40.


Working times
The option 'Working time' is applicable if the WebPlanner is configured with working hours.
For example: a booking in working times, from: working hour number 1 with a duration of 1 work hour is equivalent to the standard times, from : 09:00 to: 10:45.
- Enter the desired begin working hour in the From field.
- Enter the number of work hours of the booking in the Duration field.
The booking in the figure is represented in working times: from working hour 1 with a duration of 2 work hours.

The figure below shows that if you switch to standard times this is equivalent to from 09:00 to 12:45

It is also possible to view the duration in minutes.
In the figure below the duration of 2 working hours is represented as 225 minutes.

![]() Tip:
Tip:
- It is not always possible to convert standard times to working times with a duration in hours.
- This is because in working times a booking must always fit into exact working hour durations.
- It is however possible to convert all standard times to working times with a duration in minutes.
![]() Tip:
Tip:
- It is possible to begin a booking offsetted from a begin hour.
- In the Offset field enter the number of minutes you wish to move the booking forward.
In the figure below you see a booking with working times: From: 1, Duration: 2 working hours and Offset 15 minutes.
Which converts to standard times 09:15 to 12:45.

![]() Tip:
Tip:
- It is also possible to enter several begin hours.
The WebPlanner can then choose which begin hour is the most suitable.
It shall attempt to choose a conflictEen probleem in het rooster dat opgelost moet worden. Voorbeeld: een medewerker die op hetzelfde moment in twee verschillende ruimten moet zijn. free begin hour.
In the figure below the working hours 1 and 2 are the begin hours and the booking has a duration of 90 minutes.
This converts to standard times 09:00 to 10:30 or 10:45 to 12:15.

- It is not possible to enter several begin hours when using clock times.
Preceding and succeeding pause
When you enter a pre or post pause the WebberAlgemene benaming voor WebPlanboard of WebView. will produce a conflictEen probleem in het rooster dat opgelost moet worden. Voorbeeld: een medewerker die op hetzelfde moment in twee verschillende ruimten moet zijn. if any other booking overlaps these times.
You can choose to only have a pre or post pause or both.
- In the From and Til field enter the actual time the booking takes place.
- Check 'Pre Pause'.
- Enter the pre pause duration in minutes.
- Enter the post pause duration in minutes in the 'Post Pause' field.
- The WebberAlgemene benaming voor WebPlanboard of WebView. shall try to ensure that the booking including its pre and pause times is conflictEen probleem in het rooster dat opgelost moet worden. Voorbeeld: een medewerker die op hetzelfde moment in twee verschillende ruimten moet zijn. free.
- In the figure the actual booking is from 14:45 til 16:45 but the WebberAlgemene benaming voor WebPlanboard of WebView. tries to ensure that the booking is conflictEen probleem in het rooster dat opgelost moet worden. Voorbeeld: een medewerker die op hetzelfde moment in twee verschillende ruimten moet zijn. free from 14:15 til 17:00.


![]() Tip: In the Calender timetable you can make a pause visible is desired.
In the figure you see that on Tuesday 2 oktober 'Visit' has a pre and post pause.
Tip: In the Calender timetable you can make a pause visible is desired.
In the figure you see that on Tuesday 2 oktober 'Visit' has a pre and post pause.
![]() Warning: The user group configuration setting determines whether the pause is visible. So it is possible for example to show pauses in timetables of the planners group but not in the viewers group.
Warning: The user group configuration setting determines whether the pause is visible. So it is possible for example to show pauses in timetables of the planners group but not in the viewers group.
If you have administrator authorization you can find information about this setting in Timetable settings vinden.
Standard setting of pauses
It is possible to set a standard pause value for both pre and post pauses.
This depends on the Bookings form setting af.
When you open a new booking the pre and post pauses will already be set to the standard values.
The figure shows a new booking. The pre pause is set to 30 minutes and the post pause to 15 minutes.


![]() Tip: This can be useful when the bookings in your timetable occur at regular times.
Tip: This can be useful when the bookings in your timetable occur at regular times.
Date and time shifting
You can shift a booking in weeks, days and times.
When you enter a shift the WebPlanner calculates the new date and times of the modified booking.
- Use a positive number to shift forward in time.
- Use a negative number to shift backward in time.
![]() Warning: After submitting the booking the WebPlanner calculated the shift in the standard weeks, days or begin times.
Warning: After submitting the booking the WebPlanner calculated the shift in the standard weeks, days or begin times.
Year shifting
Enter the number of years to shift in the Year shift field.
In the example you want to shift the not yet scheduled booking on Friday 12 januari 2018 1 year forward:
- Check the Year shift box
- Enter 1 in the Year shift field
- Click the Modify buttion for example.


The figure below shows that the booking now occurs on Saturday 12 January 2019.


All work weeks stay the same in the Work weeks frame.
All the calendar weeks stay the same in the Calender weeks frame.
In the case of Date the day and month stay the same.
![]() Tip: 29 february cannot always be shifted and neither can week 53 since both are irregular.
Tip: 29 february cannot always be shifted and neither can week 53 since both are irregular.
![]() Warning: In the case of a year shift of a booking with several weeks, the same weeks should also be present in the new year.
Warning: In the case of a year shift of a booking with several weeks, the same weeks should also be present in the new year.
Period shifting
Enter the number of periods you want to shift the booking in the Period shift.
In the example you want to shift booking in period 1 of work year 17 one period forward.


- Check the Period shift box
- Enter 1 in the Period shuift field
- Click the Modify button


The booking is shifter to work year 17 period 2 and work week 20.
In the Work weeks all the work weeks stay the same.
The Period shift is not applicable in the Calendar weeks.
The Period shift is not applicable in the Date framework.
![]() Tip: You cannot shift a period accross a work year.
Tip: You cannot shift a period accross a work year.
![]() Warning: In the case of a period shift of a booking with several weeks, those weeks must also be present in the new period.
Warning: In the case of a period shift of a booking with several weeks, those weeks must also be present in the new period.
Week shifting
Enter the number of in the Week shift field. <p> In the example you want to shift the booking series in the weeks 35, 36 and 37 2 weeks forward:
- Check the Week shift boxde
- Enter 2 in the Week shift field
- Click the Modify button


In the example below the booking series is now in the weeks 37, 38 and 39.


![]() Tip: All the weeks will be shifted in the case of several weeks.
Tip: All the weeks will be shifted in the case of several weeks.
Day shifting
Enter the number of days in the Day shift field. <p> In the example you want shift the series booked in the weeks 37 38 and 39 on Friday back to Thursday:
- Check the Day shift box
- In the Day shift enter the number -1 (implying shift back 1 day)
- Click the Modify button


In the example below the booking series on Fridays in the weeks 37 38 en 39 has now shifted to Thursdays.


![]() Tip: There is no limit to the number of days you can shift, so a booking may also shift to another week.
Tip: There is no limit to the number of days you can shift, so a booking may also shift to another week.
In the example you want to shift the booking series in weeks 37 38 and 39 on Fridays 3 dags forward:
- Check the Day shift box
- Enter 3 in the Day shift field
- Click the Modify buttion


In the example below the booking series is now in the weeks 38 39 and 40 on Mondays.


Time shifting
In the Time shift field enter the number of minutes.
In the example you want to shift a booking series in the weeks 37 38 en 39 on Friday between 13:00 and 15:00 one and a half hours forward:
- Check the Time shift box
- Enter 90 in the Time shift field
- Click the Modify button


In the example below you see that the booking series in weeks 37 38 en 39 on Friday has shifted to be between 14:30 and 16:30.


![]() Warning: There is a limit to the number of minutes you may shift a booking since the booking must remain within the same day.
Warning: There is a limit to the number of minutes you may shift a booking since the booking must remain within the same day.
Day and time fields read only
The Day and time fields might be read-only for a particular group of users.
This depends on the User group settings.
In the figure you see that the input button on the right-hand side of the Date and time field is missing.
![]() Tip: This can be useful when planners are only supposed to modify other fields of the booking, the rooms for example.
Tip: This can be useful when planners are only supposed to modify other fields of the booking, the rooms for example.
Component of WebPlanboardHet gedeelte van de Webber waarmee men kan plannen.
© 2012-2023 Bitbybit Information Systems All rights reserved. No part of this documentation shall be reproduced, stored in a retrieval system, or transmitted by any means, electronic, mechanical, photocopying, recording, or otherwise, without written permission from Bitbybit Information Systems. Bitbybit Information Systems, Perspective-DB and IRIS-Planning are registered trademarks of Bitbybit Information Systems.