Geen bewerkingssamenvatting |
|||
| (73 tussenliggende versies door dezelfde gebruiker niet weergegeven) | |||
| Regel 1: | Regel 1: | ||
[[Category: | [[Category:Interactive_timetables]] | ||
[[{{NAMESPACE}}:WebView Manual| | [[{{NAMESPACE}}:WebView Manual|WebView User Manual]]<br> | ||
[[{{NAMESPACE}}: | [[{{NAMESPACE}}:WebView_select_booking_items|Timetable Settings]]<br> | ||
[[{{NAMESPACE}}:WebView_timetables_date_selection|Previous]] | |||
<p></p> | <p></p> | ||
==Interactive Timetables: Calendar, Shift and Bookinglist== | |||
There are three kinds of interactive timetable: | |||
* [[{{NAMESPACE}}:WebView_calendar_timetable|Calendar timetable]]. This format displays the days on the horizontal axis and the times on the vertical. | |||
* [[{{NAMESPACE}}:Webber_Shifts_timetable|Shifts timetable]]. This format is useful if your organisation works in shifts or many activities occur at regular times. | |||
* [[{{NAMESPACE}}:Webber_Booking_list|Booking list]]. This format displays the booking data on the horizontal axis and the dates/times on the vertical. | |||
==Calendar timetable== | ==Calendar timetable== | ||
See [[{{NAMESPACE}}:WebView_timetables|Timetables]] for explanation on general functionality that is shared by the calendar, shift and bookinglist timetables. | |||
===Preparation=== | ===Preparation=== | ||
Before opening the | Before opening the timetable determine what should be displayed. | ||
#Select the the weeks/days, the items in the booking and the kind of booking. | |||
* | #:See: | ||
* | #: | ||
* | #:*[[{{NAMESPACE}}:WebView_resource_selection|Resource selection]]. | ||
* | #:*[[{{NAMESPACE}}:WebView_date_selection|Date selection]]. | ||
* | #:*[[{{NAMESPACE}}:WebView_date_selection#Days_menu|Days menu]]. | ||
* | #:*[[{{NAMESPACE}}:WebView_date_selection#Weeks_menu|Weeks menu]]. | ||
#:*[[{{NAMESPACE}}:WebView select booking items|Select booking items]]. | |||
:<p></p> | #:*[[{{NAMESPACE}}:WebView filter bookings|Filter bookings]]. | ||
:[[Bestand: | #:<p></p> | ||
#Select the 'My selection' tab and a resource sub tab. | |||
#:For example in the figure the sub tab Activities is selected. | |||
#Tick the resources you wish to view, for example the activity Project Management. | |||
#: | |||
#:<p></p> | |||
#:[[Bestand:100enWebViewCalendarTimetablePreparation1.png|450px|none]] | |||
#:<p></p> | |||
#Click the Calendar timetable button and the Calendar timetable opens. | |||
#:In the timetable you see the booked activities you selected on the selected days. | |||
#:In the figure you see a booking on Monday starting at 11:00 with persons Atten, Bakker etc at location 317. | |||
#:<p></p> | |||
#:[[Bestand:100enWebViewCalendarTimetablePreparation2.png|350px|none]] | |||
#:<p></p> | |||
#:{{Lightbulb}} If you can't see all the information of a booking, the place the mouse indicator on the booking. A pop then appears with the booking information.<br> | |||
====My Selection Menu option: Apply grouping==== | |||
You can tick the menu option 'apply grouping' in My selection to group the timetables in separate columns. | |||
:<p></p> | :<p></p> | ||
:[[Bestand:100enWebViewCalendarTimetableApplyGrouping1.png|250px|none]] | |||
:<p></p> | :<p></p> | ||
:In the timetable you see the booked activities you selected on the selected days. In de figure you see the timetable of one resource per columnn. | |||
:See [[{{NAMESPACE}}:WebView_calendar_timetable_group_resources|Apply grouping]] for further explanation. | |||
:In the timetable you see the booked activities you selected on the selected days. In | |||
: | |||
{{ | |||
{{Lightbulb}} You can also apply the grouping when the timetable is open. Click the Menu options on the top right and in the submenu 'Apply grouping' you see the 'Apply grouping' button. | {{Lightbulb}} You can also apply the grouping when the timetable is open. Click the Menu options on the top right and in the submenu 'Apply grouping' you see the 'Apply grouping' button. | ||
=== | ===Interactive functionality=== | ||
: | In the interactive timetable you can: | ||
:[[ | * Change the start date using next/previous week/day buttons or start viewing at a specific date.<br> | ||
{{ | :See [[{{NAMESPACE}}:WebView_timetables_date_selection#Timetable_date_selection|Timetable date selection]]. | ||
* Set various booking status values on/off and determine the types of bookings to be displayed (for example cancelled bookings).<br> | |||
:See [[{{NAMESPACE}}:WebView_filter_bookings|Filter bookings]]. | |||
* Export the timetable in standard HTML and PDF formats. | |||
:See [[{{NAMESPACE}}:WebView_timetables_html_pdf_printout|Timetable printouts]]. | |||
* Export the timetable in several more advanced formats such as live feeds for the browser and smartphone. | |||
:See [[{{NAMESPACE}}:WebView_timetables_export_timetable#Export_overview|Export overview]] | |||
:and [[{{NAMESPACE}}:WebView_timetables_make_index_file_and_category|Make index file and category]]. | |||
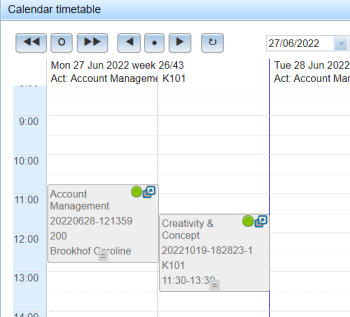
=== | ===Timetable of multiple kinds of resources=== | ||
: | :You can view multiple resource types in the Calendar timetable. | ||
:You can do this by ticking the resources in the various subtab resource types of the 'My selection' tab. | |||
:In the figure the activity Account Management and room K101 are selected and appear in separate columns because 'Apply grouping' has been checked. | |||
:It is also possible to see various resource types in the same column when 'Apply grouping' is not checked. | |||
You can | |||
:You can | |||
: | |||
: | |||
:<p></p> | :<p></p> | ||
:[[Bestand: | :[[Bestand:100enWebViewTimetablesCalendarTimetable6b.png|350px|none]] | ||
:<p></p> | :<p></p> | ||
=== | ===More options menu=== | ||
The 'More options' button opens a screen with 5 menus. | |||
<p></p> | <p></p> | ||
[[Bestand: | [[Bestand:100enWebViewTimetablesCalendarTimetable6.png|200px|none]] | ||
<p></p> | <p></p> | ||
*Select items: to select the items you want to have in a booking. See [[{{NAMESPACE}}:WebView_select_booking_items|Select booking items]]<br> | |||
*Manipulate booking (only relevant for planners). See [[{{NAMESPACE}}:WebView_manipulate_bookings|Manipulate booking]]<br> | |||
*Filter bookings: to select which kind of bookings you wish to see in the timetable. See [[{{NAMESPACE}}:WebView_filter_bookings#.22Filter_Bookings.22_menu|Filter bookings]]<br> | |||
*Export overview: to export the timetable by creating feeds and timetable links. See [[{{NAMESPACE}}:WebView_timetables_export_timetable#Export_overview|Export overview]]<br> | |||
*Grouping: to group resource items in separate columns.See [[{{NAMESPACE}}:WebView_calendar_timetable_group_resources|Group resources]].<br> | |||
{{ | |||
<p></p> | <p></p> | ||
[[Bestand: | [[Bestand:100enWebViewTimetablesCalendarTimetable7.png|300px|none]] | ||
<p></p> | <p></p> | ||
Use the 'Hide options' button to hide the 'More options' menus. | Use the 'Hide options' button to hide the 'More options' menus. | ||
<p></p> | <p></p> | ||
=== | ===Register and unregister=== | ||
: | :You can register for certain bookings.<br> | ||
: | :{{lightbulb}} To see whether you can register for a booking place the mouse cursor on the booking.<br> | ||
:If it is possible to register for the booking and there there still are vacant places, a balloon appears with the text 'Register me'.<br> | |||
:You can unregister by placing the mouse on the booking again. A balloon appears with the text 'Unregister me'.<br> | |||
:The figure shows the 'Register me' appears at the top right of the booking 'Account Management'.<br> | |||
:<p></p> | |||
:[[Bestand:100enWebViewTimetablesCalendarTimetable5.png|250px|none]] | |||
:<p></p> | |||
: | |||
: | |||
<p></p> | |||
:[[Bestand: | |||
[[{{NAMESPACE}}:WebView_calendar_timetable_group_resources|Next]]<br> | |||
[[{{NAMESPACE}}:WebView_timetables_html_pdf_printout|Timetable Publication]] | |||
[[ | |||
<p></p> | <p></p> | ||
''Component of WebView'' | ''Component of WebView'' | ||
Huidige versie van 28 nov 2022 18:40
WebView User Manual
Timetable Settings
Previous
Interactive Timetables: Calendar, Shift and Bookinglist
There are three kinds of interactive timetable:
- Calendar timetable. This format displays the days on the horizontal axis and the times on the vertical.
- Shifts timetable. This format is useful if your organisation works in shifts or many activities occur at regular times.
- Booking list. This format displays the booking data on the horizontal axis and the dates/times on the vertical.
Calendar timetable
See Timetables for explanation on general functionality that is shared by the calendar, shift and bookinglist timetables.
Preparation
Before opening the timetable determine what should be displayed.
- Select the the weeks/days, the items in the booking and the kind of booking.
- Select the 'My selection' tab and a resource sub tab.
- For example in the figure the sub tab Activities is selected.
- Tick the resources you wish to view, for example the activity Project Management.
- Click the Calendar timetable button and the Calendar timetable opens.
- In the timetable you see the booked activities you selected on the selected days.
- In the figure you see a booking on Monday starting at 11:00 with persons Atten, Bakker etc at location 317.

 Tip: If you can't see all the information of a booking, the place the mouse indicator on the booking. A pop then appears with the booking information.


My Selection Menu option: Apply grouping
You can tick the menu option 'apply grouping' in My selection to group the timetables in separate columns.

- In the timetable you see the booked activities you selected on the selected days. In de figure you see the timetable of one resource per columnn.
- See Apply grouping for further explanation.

![]() Tip: You can also apply the grouping when the timetable is open. Click the Menu options on the top right and in the submenu 'Apply grouping' you see the 'Apply grouping' button.
Tip: You can also apply the grouping when the timetable is open. Click the Menu options on the top right and in the submenu 'Apply grouping' you see the 'Apply grouping' button.
Interactive functionality
In the interactive timetable you can:
- Change the start date using next/previous week/day buttons or start viewing at a specific date.
- Set various booking status values on/off and determine the types of bookings to be displayed (for example cancelled bookings).
- See Filter bookings.
- Export the timetable in standard HTML and PDF formats.
- See Timetable printouts.
- Export the timetable in several more advanced formats such as live feeds for the browser and smartphone.
Timetable of multiple kinds of resources
- You can view multiple resource types in the Calendar timetable.
- You can do this by ticking the resources in the various subtab resource types of the 'My selection' tab.
- In the figure the activity Account Management and room K101 are selected and appear in separate columns because 'Apply grouping' has been checked.
- It is also possible to see various resource types in the same column when 'Apply grouping' is not checked.

The 'More options' button opens a screen with 5 menus.

- Select items: to select the items you want to have in a booking. See Select booking items
- Manipulate booking (only relevant for planners). See Manipulate booking
- Filter bookings: to select which kind of bookings you wish to see in the timetable. See Filter bookings
- Export overview: to export the timetable by creating feeds and timetable links. See Export overview
- Grouping: to group resource items in separate columns.See Group resources.

Use the 'Hide options' button to hide the 'More options' menus.
Register and unregister
- You can register for certain bookings.
- Tip: To see whether you can register for a booking place the mouse cursor on the booking.
- If it is possible to register for the booking and there there still are vacant places, a balloon appears with the text 'Register me'.
- You can unregister by placing the mouse on the booking again. A balloon appears with the text 'Unregister me'.
- The figure shows the 'Register me' appears at the top right of the booking 'Account Management'.


Component of WebView