Uit Bitbybit Information Systems
Geen bewerkingssamenvatting |
|||
| (7 tussenliggende versies door dezelfde gebruiker niet weergegeven) | |||
| Regel 1: | Regel 1: | ||
[[Category: | [[Category:Timetable resource selection]] | ||
[[{{NAMESPACE}}:WebView Manual| | [[{{NAMESPACE}}:WebView Manual|WebView User Manual]]<br> | ||
[[{{NAMESPACE}}:WebView expand resource selection|Expand selection]]<br> | [[{{NAMESPACE}}:WebView expand resource selection|Timetable Expand selection]]<br> | ||
[[{{NAMESPACE}}:WebView expand room selection|Previous]] | [[{{NAMESPACE}}:WebView expand room selection|Previous]] | ||
| Regel 9: | Regel 9: | ||
#Click the 'Provider' subtab. | #Click the 'Provider' subtab. | ||
#:<p></p> | #:<p></p> | ||
#:[[Bestand: | #:[[Bestand:100enWebViewExpandProviderSelection1.png|250px|none]] | ||
#:<p></p> | #:<p></p> | ||
#:A list of provider types appears. | #:A list of provider types appears. | ||
#:An example of a provider type is ' | #:An example of a provider type is 'General'. | ||
#Click a provider type to see its corresponding providers appear on the right. | #Click a provider type to see its corresponding providers appear on the right. | ||
#: <p></p> | #: <p></p> | ||
#:[[Bestand: | #:[[Bestand:100enWebViewExpandProviderSelection2.png|1200px|none]] | ||
#: <p></p> | #: <p></p> | ||
#:In the figure the provider type ' | #:In the figure the provider type 'Public Relations' was selected and its corresponding providers ADJ, FKG and DS appear on the right. | ||
#: | #:<p></p> | ||
#:You can also select several provider types at once. | #:You can also select several provider types at once. | ||
#:In the figure the provider types ' | #:In the figure the provider types 'Manager' and 'Public Relations' have been selected. | ||
#:<p></p> | #:<p></p> | ||
#:[[Bestand: | #:[[Bestand:100enWebViewExpandProviderSelection3.png|1200px|none]] | ||
#:<p></p> | #:<p></p> | ||
#Tick the boxes of the providers you wish to add to the selection. | #Tick the boxes of the providers you wish to add to the selection. | ||
#:In de figure the providers | #:In de figure the providers FKG and DS are ticked. | ||
#:<p></p> | #:<p></p> | ||
#:[[Bestand: | #:[[Bestand:100enWebViewExpandProviderSelection4.png|400px|none]] | ||
#:<p></p> | #:<p></p> | ||
#:{{Lightbulb}} Tick the box at the top left (next to Provider) in order to tick all the providers of the provider type. | #:{{Lightbulb}} Tick the box at the top left (next to Provider) in order to tick all the providers of the provider type. | ||
#Click the 'Save to basket' button. | #Click the 'Save to basket' button. | ||
#:<p></p> | #:<p></p> | ||
#:[[Bestand: | #:[[Bestand:100enWebViewExpandProviderSelection5.png|200px|none]] | ||
#:<p></p> | #:<p></p> | ||
#:The system springs to the 'My selection' tab, 'Provider' subtab and the selected providers have been added. | #:The system springs to the 'My selection' tab, 'Provider' subtab and the selected providers have been added. | ||
#:<p></p> | #:<p></p> | ||
#:[[Bestand: | #:[[Bestand:100enWebViewExpandProviderSelection6.png|650px|none]] | ||
#:<p></p> | #:<p></p> | ||
#:See also: [[{{NAMESPACE}}:WebView provider selection|Provider selection]]. | #:See also: [[{{NAMESPACE}}:WebView provider selection|Provider selection]]. | ||
| Regel 46: | Regel 46: | ||
::The providers appear on the right (if found). | ::The providers appear on the right (if found). | ||
:<p></p> | :<p></p> | ||
:[[Bestand: | :[[Bestand:100enWebViewExpandProviderSelection7.png|1300px|none]] | ||
:<p></p> | :<p></p> | ||
:In the figure the search string is | :In the figure the search string is Anette and the provider containing this string appears in the table titled 'search results: Anette', on the right. | ||
:{{Lightbulb}} If you click the Search button with an empty search field then you will get all providers (of all provider types) | :{{Lightbulb}} If you click the Search button with an empty search field then you will get all providers (of all provider types) | ||
| Regel 55: | Regel 55: | ||
:Should you miss a provider you can click the 'Create Provider' button.<br> | :Should you miss a provider you can click the 'Create Provider' button.<br> | ||
:<p></p> | :<p></p> | ||
:[[Bestand: | :[[Bestand:100enWebViewExpandProviderSelection8.png|350px|none]] | ||
:<p></p> | :<p></p> | ||
:See also: [[8.3nl_Admin:Webber Activiteit toevoegen|Create Provider]]. This button is only visible if you have administrator authorisation. | :See also: [[8.3nl_Admin:Webber Activiteit toevoegen|Create Provider]]. This button is only visible if you have administrator authorisation. | ||
:{{Lightbulb}} Only providers in the 'Resource group' list of the corresponding 'User group' are visible in Expand selection'. | :{{Lightbulb}} Only providers in the 'Resource group' list of the corresponding 'User group' are visible in 'Expand selection'. | ||
::So before attempting to create a new provider first check whether it exists in the | ::So before attempting to create a new provider first check whether it exists in the Provider resources. | ||
[[{{NAMESPACE}}:WebView expand consumer selection|Next]] | [[{{NAMESPACE}}:WebView expand consumer selection|Next]]<br> | ||
[[{{NAMESPACE}}:WebView_date_selection|Date selection]] | |||
Huidige versie van 28 nov 2022 16:11
WebView User Manual
Timetable Expand selection
Previous
Expand Provider selection
Steps
- Click the 'Expand selection' tab.
- Click the 'Provider' subtab.
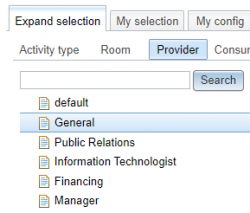
- A list of provider types appears.
- An example of a provider type is 'General'.
- Click a provider type to see its corresponding providers appear on the right.

- In the figure the provider type 'Public Relations' was selected and its corresponding providers ADJ, FKG and DS appear on the right.
- You can also select several provider types at once.
- In the figure the provider types 'Manager' and 'Public Relations' have been selected.

- Tick the boxes of the providers you wish to add to the selection.
- In de figure the providers FKG and DS are ticked.

 Tip: Tick the box at the top left (next to Provider) in order to tick all the providers of the provider type.
- Click the 'Save to basket' button.
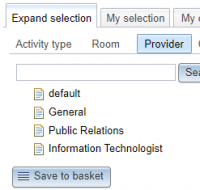
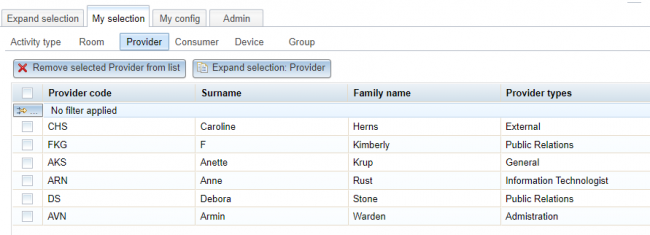
- The system springs to the 'My selection' tab, 'Provider' subtab and the selected providers have been added.
- See also: Provider selection.


Search
- If the list of provider types is very long use the Search button to find providers.
- Enter the text of you are looking for in the Search field.
- Click the Search button
- The providers appear on the right (if found).

- In the figure the search string is Anette and the provider containing this string appears in the table titled 'search results: Anette', on the right.

- Tip: If you click the Search button with an empty search field then you will get all providers (of all provider types)
Create a Provider
- Should you miss a provider you can click the 'Create Provider' button.

- See also: Create Provider. This button is only visible if you have administrator authorisation.
- Tip: Only providers in the 'Resource group' list of the corresponding 'User group' are visible in 'Expand selection'.
- So before attempting to create a new provider first check whether it exists in the Provider resources.

